
Arduino’s home security system is always been a concern of the era. People are spending thousands of rupees to make their homes secure. You don’t need to spend those rupees on home security because In this article I will show you how you can make a cost-effective Home security system. This system will help you to monitor water leakage, gas leakage, and smoke and fire.
Working of Arduino Home Security System:
The smart home security system will detect the abnormal conditions in the home and give an alert message on the LCD and the buzzer will turn on.
Components used:
- Arduino UNO
- 20*4 LCD
- LPG Gas sensor
- Fire Sensor
- Water Leakage sensor
- 10K potentiometer
- 9V battery
- Buzzer
- Connecting Wires
Smart home security system project consists of fire and smoke detection, gas leakage system, and water leakage system. We have used a fire sensor, water sensor, gas sensor, and LCD to display data. These sensors are connected to the Arduino. Arduino will receive data from this sensor and make a decision. For example, any of the sensors detect an abnormal condition at a time, or one by one they send the data to the microcontroller Arduino UNO. Based on the data receive Arduino will display the alert message and turn the buzzer on.
How to check condenser with Multimeter?
Circuit Diagram (Arduino Based smart Security System):
The figures below are the circuit diagrams of Arduino based security system for the home.
a. Software Implementation and results of Arduino Security Alarm System:
we have implemented the circuit of Arduino Security Alarm System on Proteus software and observed different scenarios

Case 1 ( Gas Leakage)
In the first case if any gas leakage will be detected the Arduino will display data like this on LCD.

Case 2 ( Water Leakage)
when the water leakage of the water from the tank or pipe will be detected then the sensor will send a signal to LCD and data like this will be shown on LCD and the buzzer will turn on.

Case 3 (Fire)
In case of a fire breakout, ARDUINO WIRELESS HOME SECURITY SYSTEM will receive a signal from the sensor and LCD will display data like this and the buzzer will turn on.

Case 4 (Water and Gas)
It can happen that due to any reason water and Gas leakage can be detected. In this case, both the sensor will detect the abnormality and will send data to Arduino. Data like this will be shown on LCD and the buzzer will turn on.

Case 5 (Water and Fire)
we have taken a scenario in which if the water leakage and fire break out happen. Then LCD will display data like this and the buzzer will turn on.

Case 6 (Gas and Fire)
If Gas leakage and fire breakout happen at the same time. Both the sensors will send data to Arduino and on LCD data like this will be shown and the alarm will turn on.

Case 7 (Gas, Water, and Fire)
In the worst case if the Gas, Water, and Fire will be detected then our circuit will look like this, and following data will be displayed on LCD and the buzzer will turn on.

How to Test a Circuit Breaker with a Multimeter
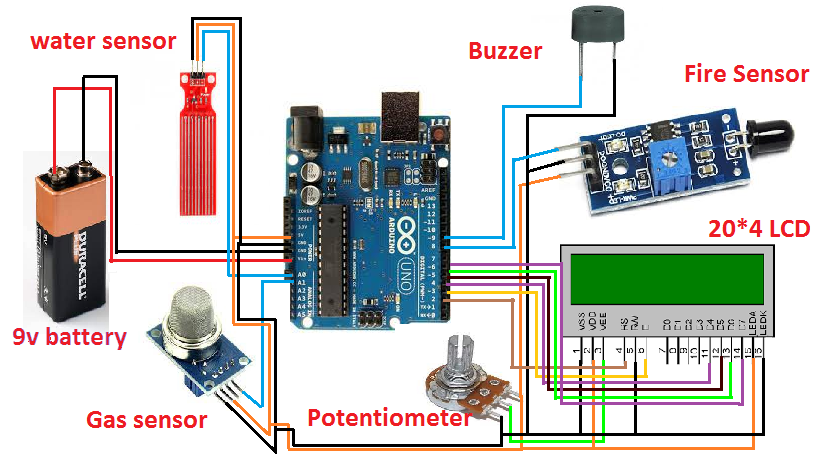
b. Hardware
After testing our circuit now it’s time to make hardware for Arduino based home Security System. The figure below is the circuit Diagram of security system for home using Arduino and sensors.

Following connections have been made to make the project
- Connect the battery positive terminal to the VCC of Arduino.
- Like wise, Connect the battery negative terminal to the GND of Arduino.
- Now, connect the Gas senor VCC and GND with battery VCC and GND.
- Also, connect the Gas senor out pin with A1 of Arduino.
- Connect the water sensor VCC and GND with battery VCC and GND.
- Also, connect the water senor out pin with A0 of Arduino.
- Connect the Flame sensor VCC and GND with battery VCC and GND.
- Also, connect the Flame senor output with pin 8 of Arduino.
- Like wise, connect the one terminal of buzzer with pin 9 of Arduino and other with GND.
- Make the connection of LCD with Arduino.
Coding: (Smart Home Security)
#include<LiquidCrystal.h>
LiquidCrystal lcd(2,3,4,5,6,7);
int buzzer=9;
int fire=8;
int gas=A1;
int water=A0;
void setup() {
Serial.begin(9600);
lcd.begin(16,2);
pinMode(buzzer,OUTPUT);
pinMode(fire,INPUT);
pinMode(gas,INPUT);
pinMode(water,INPUT);
}
void loop() {
// put your main code here, to run repeatedly:
int gasData=analogRead(gas);
int waterData=analogRead(water);
int fireData=digitalRead(fire);
Serial.print(“Gas Data:”);
Serial.println(gasData);
Serial.print(“Water Data:”);
Serial.println(waterData);
Serial.print(“Fire Data:”);
Serial.println(fireData);
if((gasData<=750)&&(waterData<=300)&&(fireData==0))
{
lcd.clear();
lcd.setCursor(0,0);
lcd.print(“You Are Safe”);
}
else if((gasData>750)&&(waterData>300)&&(fireData==1))
{
tone(buzzer,500);
delay(200);
noTone(buzzer);
lcd.clear();
lcd.setCursor(0,0);
lcd.print(“ALERT!”);
delay (100);
lcd.clear();
lcd.setCursor(0,0);
lcd.print(“GAS & WATER LEAKAGE”);
lcd.setCursor(0,1);
lcd.println(“FIRE DETECTED”);
}
else if((gasData>750)&&(waterData>300)&&(fireData==0))
{
tone(buzzer,1000);
delay(200);
noTone(buzzer);
lcd.clear();
lcd.setCursor(0,0);
lcd.print(“ALERT”);
delay (100);
lcd.clear();
lcd.setCursor(0,0);
lcd.print(“WATER LEAKAGE”);
lcd.setCursor(0,1);
lcd.print(“GAS LEAKAGE”);
}
else if((gasData<=750)&&(waterData>300)&&(fireData==1))
{
tone(buzzer,1500);
delay(200);
noTone(buzzer);
lcd.clear();
lcd.setCursor(0,0);
lcd.print(“ALERT!”);
delay (100);
lcd.clear();
lcd.setCursor(0,0);
lcd.print(“WATER LEAKAGE”);
lcd.setCursor(0,1);
lcd.print(“FIRE”);
}
else if((gasData>750)&&(waterData<=300)&&(fireData==1)) { tone(buzzer,100); delay(200); noTone(buzzer); lcd.clear(); lcd.setCursor(0,0); lcd.print(“ALERT!”); delay (100); lcd.clear(); lcd.setCursor(0,0); lcd.print(“FIRE”); lcd.setCursor(0,1); lcd.print(“GAS LEAKAGE”); } else if((gasData>750)&&(waterData<=300)&&(fireData==0))
{
tone(buzzer,2000);
delay(200);
noTone(buzzer);
lcd.clear();
lcd.setCursor(0,0);
lcd.print(“ALERT!”);
delay (100);
lcd.clear();
lcd.setCursor(0,0);
lcd.print(“GAS LEAKAGE”);;
}
else if((gasData<=750)&&(waterData>300)&&(fireData==0))
{
tone(buzzer,2500);
delay(200);
noTone(buzzer);
lcd.clear();
lcd.setCursor(0,0);
lcd.print(“ALERT!”);
delay (100);
lcd.clear();
lcd.setCursor(0,0);
lcd.print(“WATER LEAKAGE”);
}
else if((gasData<=750)&&(waterData<=300)&&(fireData==1))
{
tone(buzzer,3500);
delay(200);
noTone(buzzer);
lcd.clear();
lcd.setCursor(0,0);
lcd.print(“ALERT!”);
delay (100);
lcd.clear();
lcd.setCursor(0,0);
lcd.print(“FIRE DeETECTED”);
}
}
we have used seven cases in coding of Arduino Home Security System to detect abnormal conditions and make our home secure. In short, this smart home security system is simple and cost-effective that it can easily be built at home.
After reading this article you will be able to make wireless Home security system. we have tried to cover each aspect to secure home and will look for more and try to add those in the next update. Have you made smart home security system using Arduino and sensors for your home? Let us know in the comment section,