
Smart Street Light Project using Arduino, LDR, and IR Sensors is very popular nowadays due to its ease of use and no human intervention. LDR “Light-dependent resistor” and IR “Infrared Sensor” are the most used components in different projects. If you want to make this project without writing code and going into any hard stuff, let me make it easy for you. In this article, I will write in detail about a Street light automation system using Arduino Uno, IR sensors or Ultrasonic Sensors, and some other electronics components.
Why do we need Arduino Smart Street Light Project?
As the world is going digital so is the need of the hour that we must opt for new technologies. With a smart street light system using Arduino, we not only can manage electricity usage but also chances of accidents will be minimized. The best thing about these street lights is instead of turning on all night whenever any motion will be detected light will be turned on automatically. In case there will be no motion then these lights will be turned off.
GSM Based Bi-directional Energy Meter
Components Used:
In a smart lighting project, Arduino will act as the main controller, which will turn on or turned off the lights by taking data from sensors. I recommend you to buy them from here
- Arduino Uno
- Two IR sensors
- Light depending resistor LDR
- Two 220Ω resistors
- One 1 KΩ resistor
- Two LEDs

Before getting in to project first we will discuss the two main components used in the project.
How to design Automatic Hand Sanitizer
IR sensor Module:

The infrared (IR) sensor is an electronic device that measures and detects infrared radiation in its surrounding environment. The detection range of the sensor can be adjusted by the potentiometer mounted on the sensor.
- The effective distance range is 2 ~ 30cm
- Working voltage is 3.3V-5V.
There are two types of infrared sensors:
- Active infrared
Active infrared sensors both emit and detect infrared radiation. The Active IR sensors have two parts
- Light-emitting diode (LED)
- Receiver
When an object comes close to the sensor, the infrared light from the LED reflects off of the object and is detected by the receiver. Active IR sensors act as proximity sensors, and they are commonly used in obstacle detection systems (such as in robots).
- Passive infrared
Passive infrared (PIR) sensors only detect infrared radiation and do not emit it from an LED.
IR sensors are most commonly used in motion-based detection, such as in-home security systems, obstacle avoidance robots, line-following robots, etc.
LDR (Light Dependent Resistor)

Light-dependent resistors (LDR) are often used in electronic circuit design where it is necessary to detect the presence of light. The specifications of LDR are as follows
- Maximum Voltage: 150V
- Maximum power consumption: 100mW
- Temperature: – 30C – – +70C
- Peak Spectrum: 560
- Bright Resistor: 5-10K_
- Dark resistance: 0.8M_
LDR is a light-dependent resistor whose resistance changes with the intensity of light. When the light intensity will change the resistance of the LDR will be changed and according to that, we will make the decision whether to turn on or off the LED.
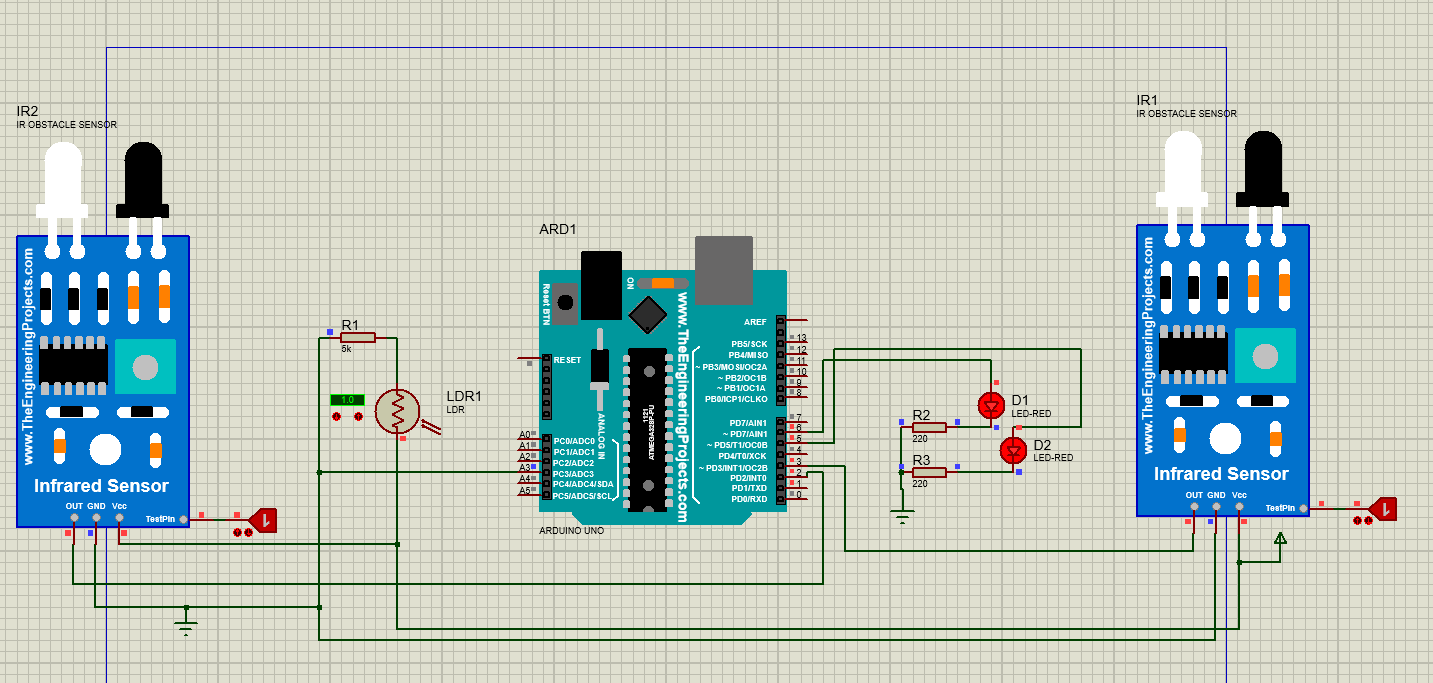
Connections Smart Street Light Project using Arduino

The connections of Arduino based Smart street light project are
- Connect the VCC of both sensors with the 5V of the Arduino
- Also, Connect the ground of both sensors with the ground of the Arduino
- Likewise, Connect the output of the first IR sensor to the digital PIN 2 of the Arduino
- Similarly, Connect the output of the second IR sensor to the digital PIN 3 of the Arduino.
- Connect the first led with the digital PIN 5 of the Arduino
- Also, Connect the second led with the digital PIN 6 of the Arduino.
- And Connect the other terminal of both led with the ground through 220 Ohm resistor.
- Likewise, Connect one side of LDR with VCC.
- Also, Connect the other side of LDR with the ground through a 5K Ohm resistor.
- Similarly Connect the second leg of LDR with an A3 pin of Arduino.
Smart street lighting system Coding
The coding of the smart lighting system for streets is given below. What you all have to do is copy this code and paste it into Arduino IDE software. Then make a .hex file and upload it to Arduino

// we are defining the pins of Arduino on which IR sensor, LDR and LEDS are connected .
int IR1 = 2;
int IR2 = 3;
int LED1 = 5;
int LED2 = 6;
int LDR = A3; //In this function, we will define the input and output pins.
void setup()
{
Serial.begin(9600); // Here IR sensor and LDR is defined as input while, LED is defined as output
pinMode(LED1, OUTPUT);
pinMode(LED2, OUTPUT);
pinMode(IR1, INPUT);
pinMode(IR2, INPUT);
pinMode(LDR, INPUT);
}
void loop()
{
// This command is used to read the data of the LDR.
intLDRValue = analogRead(LDR);
Serial.print(“sensor = “);
Serial.print(LDRValue);
delay (500); //Also, This command is showing that In the start both the leads will be off.
digitalWrite(LED1, LOW);
digitalWrite(LED2, LOW); // Here we are applying the condition that when the LDR value will be less than 100 and the object is in front of the sensor (IR1), Led will be turned on.
if (LDRValue< 100 && digitalRead(IR1) == HIGH)
{
digitalWrite(LED1, HIGH);
} // similarly, we are applying the condition that when the LDR value will be less than 100 and the object is in front of the sensor (IR2), Led will be turned on.
if (LDRValue< 100 && digitalRead(IR2) == HIGH)
{
digitalWrite(LED2, HIGH);
}
}
After reading this article “Arduino Smart Street Light Project” you will be able to make a project of your own choice. We have tried to cover each aspect of the street light and will keep it updated. Have you found anything interesting? then let us know in the comments section.
Frequently Asked Questions (FAQs)
Here are some frequently asked questions
How does a smart street light work?
When an object comes close to the sensor, the infrared light from the LED reflects off of the object and is detected by the receiver. In this way, the light will turn on.
What sensors do smart street lights use?
The sensors used in a street light project using Arduino are IR sensors or ultrasonic sensors. Other components are
- Arduino Uno
- Two IR sensors
- Light depending resistor LDR
- Two 220Ω resistors
- One 1 KΩ resistor
- Two LEDs
What are the advantages of smart street lights?
The smart street light will save electricity. Whenever any motion will be detected light will be turned on automatically. In case there will be no motion then these lights will be turned off.