
Arduino Uno limit switch Interfacing and Programming is the best topic for those who want to use a limit switch with Arduino Uno, Nano, or Mega. You will find a lot of articles on the internet but the unique thing about this limit switch article is I have explained everything from interfacing to the final testing. Before proceeding further first of all we will learn.
What is Arduino Uno Limit Switch?
If you are familiar with limits then you might have an idea about Limit Switches. Limit Switches are one of the most commonly used electronic components. These switches are used where we want to define the limits, Left and Right, Upper and Down, etc. These types of switches are commonly used in Solar Trackers, Garage Doors, Cabinets, Security systems, Accident detection systems, etc.

Arduino Limit switch
Limit switches have been used as the most frequent components in different projects where the applying limit is necessary. For example, the movement of the Garage Door can be controlled using the limit switch. Also, these switches are used in industries. The best thing about these switches is their construction is similar to an ordinary push-button but with a different design.
Now if you don’t have a Limit switch you don’t worry about anything because you can use a normal push button as a Limit switch.
Component Used
- Arduino Uno
- Limit switch
- Battery
- 10K ohm resistor
- Connecting Wires
There are different types of Limit switches are available in the market like roller type, It doesn’t matter which switch you are using, the basic working will be the same. Likewise, limit switches can also be used with any microcontroller like Arduino Mega, Uno, Nano, 8051 microcontrollers, pic microcontroller, PLC, raspberry pi, etc.
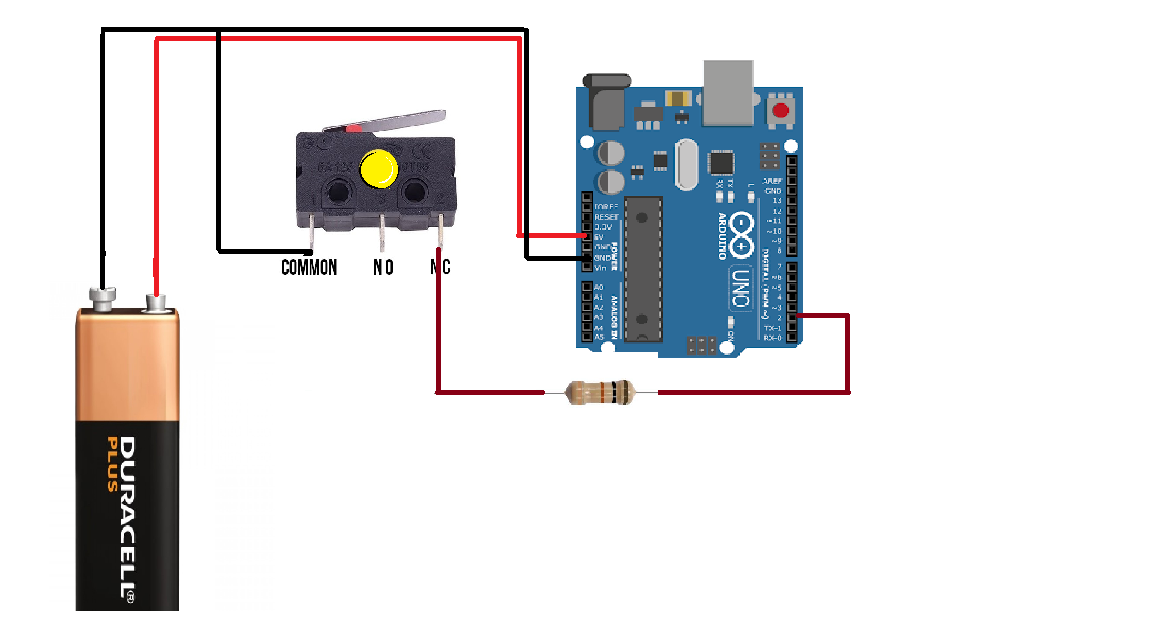
Limit Switch Wiring with Arduino Uno

As shown in the diagram the connections of the Arduino limit switch are very simple.
- Connect the battery positive terminal with a 5v pin of Arduino
- Likewise, connect the battery negative terminal with the GND pin of Arduino
- Also, connect the limit switch common terminal with the negative battery.
- Connect the NC terminal of the limit switch through a 10K ohms resistor to the battery positive terminal.
- Connect the NC terminal of the limit switch with pin 2 of Arduino.
GSM Based Bi-directional Energy Meter
How to make an LED Chaser circuit using Arduino?
Limit Switch Arduino Programming
Here we are controlling the door movement through a limit switch
Limit Switch Arduino Programming Explanation
Finally, I defined a flag of the type integer. this flag will be used to stop the unnecessary repetition of code.
//L Switch which is connected with the Arduino’s PIN 2
int Lswitch = 2;
// Led is connected at PIN 2 of Arduino.
int led = 13;
//defining flag to avoid un
int flag = 0;
void setup()
{
//9600 as the baud rate
Serial.begin(9600);
//taking limit switch as input
pinMode(Lswitch, INPUT);
//taking limit led as output
pinMode(led, OUTPUT);
}
void loop()
{
//limit switch is open and flag is 0 then door will be closed and LCD will display data like this
if( (digitalRead(Lswitch) == LOW) && (flag == 0) )
{
Serial.println(“door is closed”);
flag = 1;
delay(20);
}
//limit switch is open and flag is 1 then door will be open and LCD will display data like this
if( (digitalRead(Lswitch) == HIGH) && (flag == 1) )
{
Serial.println(“door is opened”);
flag = 0;
delay(20);
}
//if the flag is 1 then the LED will be turned ON for 1 second and then remains off for 1 second, this repeats again and again.
if ( flag == 1 )
{
digitalWrite(led, HIGH);
delay(1000);
digitalWrite(led, LOW);
delay(1000);
}
if ( flag == 1 )
{
digitalWrite(led, LOW);
}
digitalWrite(Lswitch, HIGH);
}
After reading this article “Arduino limit switch” you will be able to make your circuit. We have tried to cover each aspect of the limit switch using Arduino and will look for more and try to add those in the next update. Limit switch Arduino worked for you? Let us know in the comments section
Frequently Ask Questions(FAQs)
When would you use a limit switch?
The limit switch is used where the applying limit is necessary. Let’s say if we want to limit the movement of the Garage Door we will use the limit switch. These switches are similar to normal push buttons but have different designs.
Does a limit switch need a resistor?
As shown in the diagram we need a resistor while connecting NC (Normally Closed) terminal with the Arduino. Sometimes we used it and sometimes not it depends on the type of application.
Does the limit switch have polarity?
Limit switches have three terminals Normally Open, Normally Closed, and Common. Make sure to make connections at the right pin. That’s the reason Polarity matter a lot in the case of a Limit switch.