
Bidirectional Energy Meter record, measure, and indicate both incoming and outgoing (self-produced electricity by renewable energy sources and excess to be sold to grid) electricity.
A solar photovoltaic system is used in net metering. The design of a bidirectional energy meter is low cost, affordable to consumers for domestic application, and efficient. The current work focuses on the development of bidirectional metering which accounts for the net usage, export, and monetary exchange.
you may like to read
Working of Bidirectional Energy Meter
Single Phase Bi-directional Meter consists of Arduino which acts as the main central processing unit and the LCD to display the net energy at regular intervals.
Component used
- PV Solar Panel
- Amplifiers (Op-amp IC 741)
- Regulators (LM 7809)
- STORAGE BATTERY
- DOMESTIC LOAD
- Arduino
- LCD
- UTILITY GRID
- voltage sensor
- current sensor
The proposed system uses Arduino (Type of ATmega 328) as a processing unit. The input to the Arduino is fed from a voltage and current measuring circuit which processes the input data and calculates the net output energy using instantaneous values of voltage and current. The net output energy is displayed through LCD which is interfaced with Arduino.
The image below is the Block diagram of bidirectional energy meter

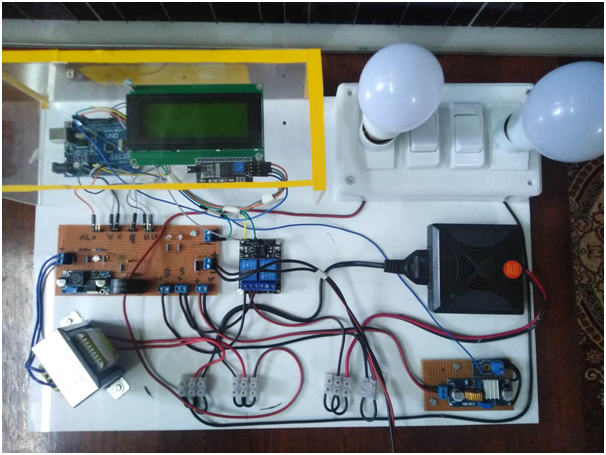
Hardware Implementation of Net Metering
The image below is the circuit diagram of bidirectional energy meter
A 60 W incandescent lamp is considered as the load. When it is switched on by the supply either with grid or with solar, the voltage and current is measured and fed to the Arduino. The energy is calculated and displayed at regular intervals of 4 seconds in LCD.


You may like to read Prepaid and Theft Detection Energy Meter using GSM and Arduino
Coding(Bidirectional energy meter using Arduino)
we have done the coding of two way energy meter in Arduino IDE software
#include <LiquidCrystal_I2C.h> LiquidCrystal_I2C lcd(0x27, 2, 1, 0, 4, 5, 6, 7, 3, POSITIVE); #include "EmonLib.h" // Include Emon Library EnergyMonitor emon1; // Create an instance const int voltageSensor = A2; float vOUT = 0.0; float vIN = 0.0; float R1 = 30000.0; float R2 = 7500.0; int value = 0; const int relay = 2; const int led1 = 3; const int led2 = 4; double sumWH = 0.00000; double net = 0.00000; float WH = 0;//energy consumption in watt hour double sumRupees = 0.00000;//Total energy consumption in rupees float rupees = 0;//energy consumption in rupees// Create an instancee float realPower=0; float apparentPower=0; float powerFActor; int supplyVoltage=0; float Irms=0; double sumWH1 = 0.00000; float WH1 = 0;//energy consumption in watt hour double sumRupees1 = 0.00000;//Total energy consumption in rupees float rupees1 = 0;//energy consumption in rupees// Create an instancee float realPower1=0; float apparentPower1=0; float powerFActor1; int supplyVoltage1=0; float Irms1=0; void setup() { Serial.begin(9600); lcd.begin(20,4); pinMode(led1, OUTPUT); pinMode(led2, OUTPUT); digitalWrite(led1, LOW); digitalWrite(led2, LOW); pinMode(relay, OUTPUT); digitalWrite(relay, LOW); delay(100); emon1.voltage(A0, 380, 0); // Voltage: input pin, calibration, phase_shift emon1.current(A1, 4); // Current: input pin, calibration. lcd.clear(); } void loop() { DC_volage(); //meter(); //meter1(); net_result(); display1(); } void net_result() { net=sumWH1-sumWH; lcd.setCursor(0,3); lcd.print("total= "); lcd.setCursor(6,3); lcd.print(net); if(sumWH>sumWH1) { lcd.setCursor(14,3); lcd.print("Loss "); } if(sumWH<sumWH1) { lcd.setCursor(14,3); lcd.print("Profit"); } } void meter() { for(int i=0; i<=6; i++) { emon1.calcVI(30,2000); // Calculate all. No.of half wavelengths (crossings), time-out // emon1.serialprint(); // Print out all variables (realpower, apparent power, Vrms, Irms, power factor) realPower = emon1.realPower; //extract Real Power into variable apparentPower = emon1.apparentPower; //extract Apparent Power into variable // powerFActor = -emon1.powerFactor; //extract Power Factor into Variable supplyVoltage = emon1.Vrms; //extract Vrms into Variable Irms = emon1.Irms; //extract Irms into Variable } units(); } void DC_volage() { value = analogRead(voltageSensor); vOUT = (value * 5.0) / 1024.0; vIN = vOUT / (R2/(R1+R2)); //Serial.print("Input = "); //Serial.println(vIN); if(vIN>=13) { digitalWrite(relay, HIGH); lcd.setCursor(19,2); lcd.print("S"); lcd.setCursor(19,1); lcd.print(" "); digitalWrite(led1, HIGH); digitalWrite(led2, LOW); meter1(); } if(vIN<=12) { digitalWrite(relay, LOW); lcd.setCursor(19,1); lcd.print("G"); lcd.setCursor(19,2); lcd.print(" "); digitalWrite(led1, LOW); digitalWrite(led2, HIGH); meter(); } // delay(500); } void display1() { // lcd.setCursor(0,0); // lcd.print("Solar I/P= "); // lcd.setCursor(11,0); // lcd.print(vIN); // lcd.setCursor(0,0); lcd.print("V: "); lcd.setCursor(2,0); lcd.print(supplyVoltage); lcd.setCursor(6,0); lcd.print("I: "); lcd.setCursor(8,0); lcd.print(Irms); lcd.setCursor(13,0); lcd.print("P: "); lcd.setCursor(15,0); lcd.print(apparentPower,1); lcd.setCursor(0,1); lcd.print("GU= "); lcd.setCursor(3,1); lcd.print(sumWH,1); lcd.setCursor(8,1); lcd.print("GR= "); lcd.setCursor(11,1); lcd.print(sumRupees); lcd.setCursor(0,2); lcd.print("SU= "); lcd.setCursor(3,2); lcd.print(sumWH1,1); lcd.setCursor(8,2); lcd.print("SR= "); lcd.setCursor(11,2); lcd.print(sumRupees1); } void units() { //delay(8000); float power1=apparentPower*20; WH = (power1 / 3600);//3600 sumWH = sumWH + WH; rupees = getReading(); sumRupees = sumRupees + rupees ; } float getReading() { float solution; if(sumWH <= 50) solution = (WH * 8.15);//3.15 if(( sumWH > 50 ) && ( sumWH <= 100 )) solution = ( WH * 3.60 ); if(( sumWH > 100 ) && (sumWH <= 250)) solution = (WH * 4.25); if(sumWH > 250) solution = (WH * 5.20); return solution; } void meter1() { for(int i=0; i<=6; i++) { emon1.calcVI(30,2000); // Calculate all. No.of half wavelengths (crossings), time-out // emon1.serialprint(); // Print out all variables (realpower, apparent power, Vrms, Irms, power factor) realPower = emon1.realPower; //extract Real Power into variable apparentPower = emon1.apparentPower; //extract Apparent Power into variable // powerFActor = -emon1.powerFactor; //extract Power Factor into Variable supplyVoltage = emon1.Vrms; //extract Vrms into Variable Irms = emon1.Irms; //extract Irms into Variable } units1(); } void units1() { //delay(8000); float power3=200-apparentPower; float power2=power3; WH1 = (power2 / 3600);//3600 sumWH1 = sumWH1 + WH1; rupees1 = getReading1(); sumRupees1 = sumRupees1 + rupees1 ; } float getReading1() { float solution1; if(sumWH1 <= 50) solution1 = (WH1 * 8.15);//3.15 if(( sumWH1 > 50 ) && ( sumWH1 <= 100 )) solution1 = ( WH1 * 3.60 ); if(( sumWH1 > 100 ) && (sumWH1 <= 250)) solution1 = (WH1 * 4.25); if(sumWH1 > 250) solution1 = (WH1 * 5.20); return solution1; }We have discussed Bi directional meter in detail and look for more in
next update. You can make this project for final year project. Will you
make it for fyp? then let us know in the comments section.
sir kindly post circuit diagram for this project please.
ok, soon I will provide
hello sir sorry to disturb ,i asked for circuit diagram 3 days back….it will be help full for my project. kindly upload sir please
Hello. How can I get the circuit diagram please?
Hello Sir, kindly provide the circuit diagram.