
The emergency power pack has been developed to assist tourists during their journey. A solar panel and a small turbine were attached to the portable power pack to charge the battery while there is no proper power supply source within the area. Besides this power pack is equipped with a Global Positioning System (GPS) and Global System of Mobile Communication (GSM). Simply by pressing the switch, they can send SOS messages to call for help.
Why you need emergency lighting module power pack?
The emergency power pack is the best tool to assist the tourists. The unique thing about this power pack is it has portable battery. This power pack has Global Positioning System (GPS) and Global System of Mobile Communication (GSM). With GPS service you can send message to any relative if you are stuck in woods.
How to test VFD with multimeter?
How emergency power pack work?
In Emergency power pack we have interfaced different circuits with each other as shown in figure below.
Components
- Solar Panel
- Small Turbine
- Micro Controllers
- Liquid Crystal Display (LCD)
- Global System for Mobile Communication (GSM)
- Global Positioning System (GPS)
- Rechargeable battery
- Universal Serial Bus (USB)

Figure 1: Block diagram
When we turn on the device and press the button then GSM will send your location on the mobile number you added.
We have used Solar panel energy for generating electricity in the day time and at night we have used small water turbines to change this system. The controller is also used to provide the optimum charge to the batteries and will protect the battery from the damage due to overcharge, deep discharge, and changing voltage levels. To charge this system using an external source USB port is available. Arduino is used for control purposes and GSM for sending the message. LCD is used to display our Location.
Digital Keypad Security Door Lock using Arduino
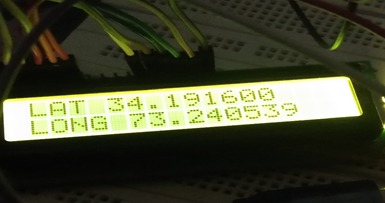
Results of the Emergency power pack

Figure 2: Real-Time Result of Latitude and Longitude through GPS

Figure 3: Real-Time Result of Text Received through GSM
Coding: (Emergency Power Pack)
#include
#include <TinyGPS++.h>
#include
#include
LiquidCrystal lcd(12, 11, 5, 4, 3, 2);
static const int RXPin = 0, TXPin = 1;//gps
static const uint32_t GPSBaud = 9600;
// The TinyGPS++ object
TinyGPSPlus gps;
// The serial connection to the GPS device
SoftwareSerial ss(RXPin, TXPin);//gps perameters
SoftwareSerial mySerial(9,10);//gsm perameters
char msg;
char call;
int buttonpin=13;
float latitude,longitude ;
void setup()
{
pinMode(buttonpin,INPUT);
lcd.begin(16,2);
mySerial.begin(9600); // Setting the baud rate of GSM Module
Serial.println(“press button”);
Serial.begin(9600);
ss.begin(GPSBaud);
lcd.print(“Emergency Power Pack”);
lcd.setCursor(0, 1);
lcd.print(“Supervoised By Dr.Fazal”);
delay(2000);
lcd.clear() ;
}
void loop()
{
while (ss.available() > 0){
gps.encode(ss.read());
if (gps.location.isUpdated()){
latitude = (gps.location.lat());
Serial.print(“Latitude= “);
Serial.print(latitude,6);
longitude = (gps.location.lng());
Serial.print(” Longitude= “);
Serial.println(longitude,6);
//Serial.print(“Latitude=”); Serial.println(latitude,6);
// Serial.print(“longitude=”); Serial.println(longitude,6);
lcd.print(“LAT “);
lcd.print(latitude,6);
lcd.setCursor(0, 1);
lcd.print(“LONG “);
lcd.print(longitude,6);
delay(1000);
lcd.clear();
}
if(digitalRead(buttonpin)==HIGH)
{
Serial.println(“button pressed, co-ordinates sent”);
delay(2000);
SendMessage();
}
if (mySerial.available()>0)
Serial.write(mySerial.read());
}//while loop end
}
//gsm
void SendMessage()
{
mySerial.println(“AT+CMGF=1”); //Sets the GSM Module in Text Mode
delay(1000); // Delay of 1000 milli seconds or 1 second
mySerial.println(“AT+CMGS=”+923059563308″r”); // set mobile number
delay(1000);
mySerial.print(“I am in trouble, please help me.”);
mySerial.print(“n”);
mySerial.print(“My coordinates are: n “);
mySerial.println(“Longitude : “);// The SMS text you want to send
mySerial.print(longitude,6);
mySerial.print(“n”);
mySerial.println(” Latitude : “);// The SMS you want to send
mySerial.print(latitude,6);
delay(100);
mySerial.println((char)26);// ASCII code of CTRL+Z
delay(1000);
}