
The world is going digital so digital door locks are the need of the century. These locks must be so advanced that no one can open them illegally. There are many types of locks like fingerprints, retina scanners, etc. These Projects are expensive so I will show you how you can build a low-cost digital keypad security door lock using Arduino. Following these steps, anyone can build a door lock for them.
You can download the Proteus file from here
Components
The list of components used in the project are as follow
- Arduino
- 3 x 4 matrix keypad for Arduino
- 20 x 4 Alpha-Numeric LCD
- PCF8574A Remote 8-bit expander
- Red and Green LED
- Push-button
- Battery source
- Resistors
- Connecting wire
How to make Smart Irrigation System using Arduino?
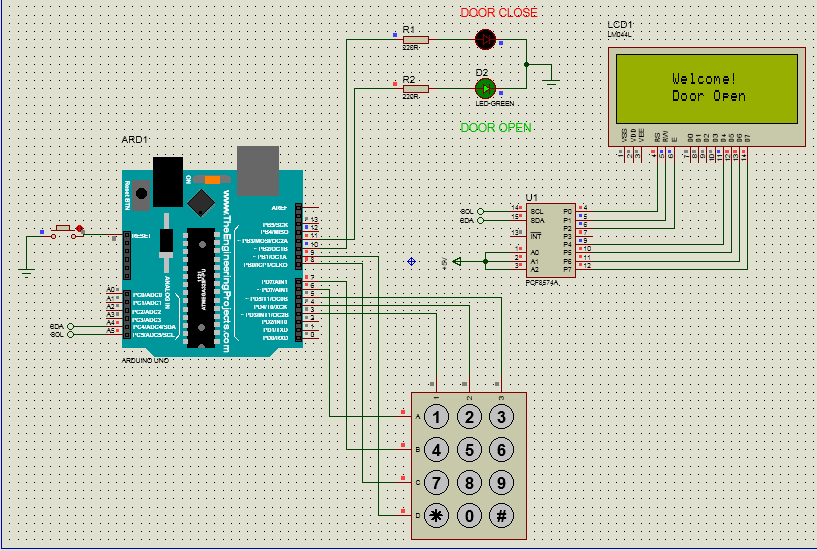
Circuit Diagram for Arduino Keypad Door Lock
The circuit diagram for our Arduino-based Digital Keypad Door Lock is shown below.

The microcontroller is the brain of the project. The micro-controller is connected to an LCD through PCF8574A Remote 8-bit expander, Keypad, and Red and Green LED. The keypad is used to enter passwords and the LCD will display the messages. The Red and Green LED is used to show whether the door is open or closed.
When the user will enter the correct password the Green LED will turn on, this indicates that the door is open. After Some time door will be locked automatically and Red LED will turn on. It means by entering the correct password user can open the door.
You may like to read
Smoke Detection using Arduino and MQ-2 Gas Sensor
Coding ( Arduino door lock using 3×4 keypad )
The complete Arduino Door Lock Code can be found below. Before compiling the code it is important to make sure you have added the following keypad and LCD library to your Arduino IDE. To add a libraries download the keypad Library and LCD library as the ZIP file. Then on your Arduino IDE click on Sketch -> Include Library -> Add.ZIP Library and browse for the file that you just downloaded.
We are setting Password for our door lock system and are displaying different messages on LCD for user guidance. In this case, the set password is ”123”.
#include<Keypad.h>
#include <Wire.h>
#include <LiquidCrystal_I2C.h>
LiquidCrystal_I2C lcd(0x3F,20,4);
char keys[4][3]={
{‘1′,’2′,’3’},
{‘4′,’5′,’6’},
{‘7′,’8′,’9’},
{‘*’,’0′,’#’}};
byte rowPin[4]={6,7,8,9};
byte colPin[3]={3,4,5};
String password = “123”; // The Pin Code.
int position = 0;
int wrong = 0; // Variable to calculate the wrong inputs.
int redPin = 10;
int greenPin = 11;
Keypad keypad=Keypad(makeKeymap(keys),rowPin,colPin,4,3);
// MAPPING THE KEYPAD.
int total = 0; // Variable to determine the number of wrong attempts.
void setup()
{
pinMode(redPin,OUTPUT);
pinMode(greenPin,OUTPUT);
lcd.init(); //lcd startup
lcd.init();
lcd.backlight();
lcd.print(” welcome “);
lcd.setCursor(0,1);
lcd.print(“Smart Door Lock”);
lcd.setCursor(0,2);
lcd.print(” By”);
lcd.setCursor(0,3);
lcd.print(“Geeky Engineers”);
delay(3000);
lcd.clear();
setLocked(true);
delay(20);
}
//On LCD message will be displayed that Enter your Password. Users have to enter the password through the keypad. If the input password does not match, LCD will display the message “Wrong Password “ to notify with 1 second of delay and remains in its lock position and again ask for a password.
void loop()
{
lcd.clear();
lcd.print(“Enter your Password”);
delay(100);
char pressed=keypad.getKey();
String key[3];
if(pressed)
{
lcd.clear();
lcd.print(“Enter your Password”);
lcd.setCursor(position,2);
lcd.print(pressed);
delay(500);
if(pressed == ‘*’ || pressed == ‘#’)
{
position = 0;
setLocked(true);
lcd.clear();
}
else if(pressed == password[position])
{
key[position]=pressed;
position++;
}
else if (pressed != password[position] )
{
wrong++;
position ++;
}
if(position == 3){
if( wrong >0)
{
total++;
wrong = 0;
position = 0;
lcd.clear();
lcd.setCursor(0,2);
lcd.print(” Incorrect Password!”);
delay(1000);
setLocked(true);
}
else if(position == 3 && wrong == 0)
{
position = 0;
wrong = 0;
lcd.clear();
lcd.setCursor(0,1);
lcd.print(” Welcome! “);
lcd.setCursor(5,2);
lcd.print(” Door Open”);
delay(2000);
setLocked(false);
}
if(total ==3)
{
total=0;
delay(500);
}
}
}
}
//If the entered password will be correct then the green LED will turn on and message will be displayed on LCD. If the entered password will be wrong then Red LED will remain on.
void setLocked(int locked)
{
if (locked)
{
digitalWrite(redPin, HIGH);
digitalWrite(greenPin, LOW);
delay(1000);
}
else
{
digitalWrite(redPin, LOW);
digitalWrite(greenPin, HIGH);
delay(2000);
digitalWrite(redPin, HIGH);
digitalWrite(greenPin, LOW);
}
}
I hope after reading “Smart door lock using Arduino” you will be able to make your own project. we have tried to cover every thing and look for more and add this is next update. How was this project?. Let us know in comment section
Hey Geeky Engineers,
Is there any method, if someone enters wrong password thrice the door get locked permanently unless we use another master code.
yeah, it is possible. you just have to change the code a bit