Smoke detection is very important because it is dangerous and can cause accidents. In this tutorial, we will make a smoke detection sensor using Arduino and MQ-2.
Click here to download the Proteus simulation file
What is an MQ-2 Smoke Sensor?
Inside the smoke sensor, there is a built-in potentiometer that allows adjusting the sensitivity according to how accurate you want to detect gas. The resistance of the sensor depends on the type of gas. The MQ-2 sensor is sensitive to smoke and different flammable gases like LPG, Methane, Alcohol, Butane, Hydrogen, Butane, and Propane.
Working and Explanation
The output voltage of the sensor changes accordingly with smoke or gas levels in the atmosphere. The output voltage of the sensor is directly proportional to the concentration of smoke. The higher is the gas the higher will be the voltage the lower is the gas the lower will be the voltage.
How to test capacitor with ohm meter
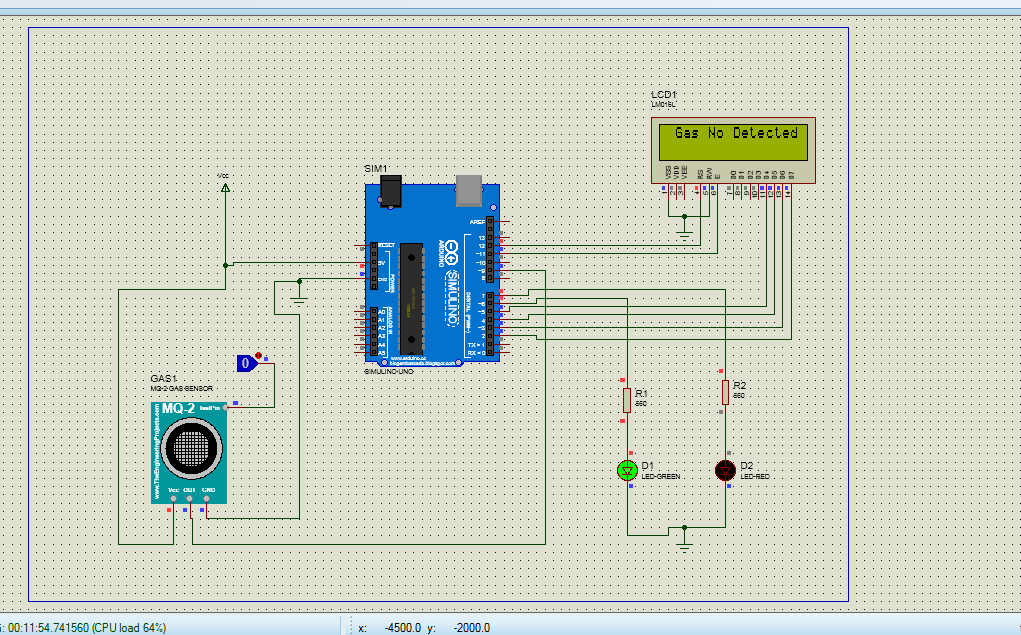
When the gas will be detected in the atmosphere the red lead will turn otherwise green lead will be on.
Components Used
- Arduino Uno
- Gas sensor MQ-2
- Resistors
- Lcd
- Red led
- Green led
- Connecting wires
- Battery source
you may like to read How to get back your virtual terminal in Proteus
Circuit Diagram
The circuit diagram of the Smoke sensor is below

The MQ-2 sensor has 4 pins.
- Test Pin
- Out pins
- GND
- VCC
Coding (Smoke Detection using Arduino and MQ-2 Gas Sensor)
The coding of the smoke sensor using Arduino is below
#include<LiquidCrystal.h>
LiquidCrystal lcd(12 , 11 , 5 ,4 ,3 ,2);
int Gas = 9;
int redLed = 7;
int greenLed = 6;
void setup() {
pinMode(Gas , INPUT);
}
void loop() {
if(digitalRead(Gas) == HIGH){
lcd.setCursor(0,0);
lcd.print(” Alert Gas Detected”);// Msg on lcd and red lcd will be on
digitalWrite(7 , HIGH);
digitalWrite(6, LOW);
}
else{
lcd.setCursor(0,0);
lcd.print(” No Gas detected “);// Msg on lcd and green lcd will be on
digitalWrite(6, HIGH);
digitalWrite(7 ,LOW);
}
delay(500);
lcd.clear();
}
After reading this article “Smoke Detection using Arduino and MQ-2 Gas Sensor” you will be able to make this project. We have tried to cover each aspect of the MQ-2 Gas Sensor and will look for more and try to add those in the next update. Will you make this project? Let us know in the comments section below.


Thanks for the project